HA | ESPresense, Indoor Positioning
Set up Home Assistant to do Indoor positioning with ESPresense, tracking wearables and other devices.


Overview
Setting up ESPresense is almost too easy. The developer has made the installation process so easy that it only takes some minutes to get a single base station setup. While you will need several base stations and things to track, it still took me only about 30 - 40 minutes to set up five base stations around the house.
However, configuring the tracking beacons, the things you track presence with can be trickier. Also, to be noted that some of the things you thought you would track, you perhaps can't, or at least cannot do it without some compromises.
The tracking is based on Bluetooth MAC address/ID/fingerprint, and it can be tricky to identify which device has what address. Some devices have changing MAC addresses (e.g. Apple), and seems most devices do not broadcast the MAC address after connecting to another device (e.g., Garmin smartwatches).

What can you track
You can track the e.g., Garmin watches, but you would need to disconnect it from your phone or turn off phone Bluetooth, which then disables smart notifications, so the watch is not so smart anymore; that was a huge disappointment. What can you track then? So far, I have tested and used the following:
- Oura ring
- Phones (with Home Assistant companion app)
- Bluetooth tags
Oura seems almost perfect in terms of wearable tracking; it's almost always on me and gives a quite accurate positioning (while not using the Oura app, once you open the app, the ring disappears from tracking and comes back once you close the app.)
Phones (with the HA companion app) work reliably too, but nowadays, we don't always carry our phones from room to room; those can be close by, but not necessarily in the same room. So not so reliable for indication person's presence.
If you have Bluetooth tags like keyrings, you can track them as things but cannot use them to indicate a person's presence.
Installing firmware on base station via browser
This works with Chrome. Connect your ESP32 with USB cable to your computer and go to https://espresense.com/install. Select ESP32 and press Connect

You'll be presented with a popup to connect to your ESP32 device, select the device, and press Connect.

Another popup will appear, Click INSTALL ESPRESENSE and wait for the installation to complete. (if you go surfing to other pages, the connection can time out.)

Once installed, I opened my mobile phone Wi-Fi settings and connected to the esp32 device (espresense_xxxxxxx). I filled in only my IoT wifi details and rebooted the esp32.
I went to my router to find out the esp32 device IP address and reserved it for the device. Once I put the device in its place I'll probably lock it also to the nearest access point.

Next, I started up Chrome again on my computer and browsed to the assigned IP address.
Add the room name and your MQTT server connection. Change the preferences according to your needs (most of these will also have a switch in Home Assistant)
Filtering
- Maximum distance to report - I am using this to roughly match the room area, which will report a device to be in the room.
Calibration
- Rssi expected from a 0dBm transmitter from 1m - I measured and tested with different devices to find an optimal value for 1m (on average roughly right)
Additional Sensors
PIR motion pin - I have my PIR (Passive Infrared) sensor attached to the pin 4


You need to repeat the above Firmware installation process for all your ESP32 devices.
Configuring Home Assistant
If you have enabled Home Assistant discovery you will automatically get bunch of switches and the motion sensor for the room.
To track devices, you need to define them in the configuration.yaml under sensor. To do this you need to find out the BLE MAC/device ID, and this is where it gets tricky. Some devices happily broadcast the BLE MAC, some have constantly changing BLE MAC and once the device is connected to another device like a smartwatch to a phone, they stop broadcasting the MAC and makes it impossible to track it with this setup.

I used MQTT explorer on my laptop to tap into my MQTT server and find out device IDs that the ESPresense is reporting and I used nRF connect for mobile (on my android phone) to find the BLE MACs for devices and then tried to figure out which is what device.
sensor:

  ## ESPresense
  - platform: mqtt_room
    device_id: "b049e431937c"
    name: 'Jukka Oura'
    state_topic: 'espresense/rooms'
    timeout: 5
away_timeout: 120 # seconds after the enitity will get status not_homeTo test and control the ESPresense devices, I did a small dashboard per room (device)

type: entities
entities:
- type: section
- entity: binary_sensor.espresense_office
name: ESPresense
type: custom:secondaryinfo-entity-row
secondary_info: '{{state_attr(''binary_sensor.espresense_office'', ''ip'') }}'
- entity: button.espresense_office_restart
name: Restart
- type: section
- entity: sensor.espresense_office_uptime
name: Uptime
icon: mdi:clock-outline
- type: section
- entity: switch.espresense_office_active_scan
name: Active Scan
icon: mdi:magnify-scan
- entity: switch.espresense_office_status_led
name: Status LED
icon: mdi:led-on
- entity: number.espresense_office_max_distance
name: Distance
icon: mdi:signal-distance-variant
- type: section
- entity: switch.espresense_bedroom_auto_update
name: Auto Update
icon: mdi:update
- entity: switch.espresense_bedroom_ota_update
name: OTA Update
icon: mdi:update
- type: section
- entity: binary_sensor.espresense_bedroom_motion
name: Motion
show_header_toggle: false
header:
type: picture
image: local/room_bedroom.jpg
tap_action:
action: none
hold_action:
action: none
title: Bedroom
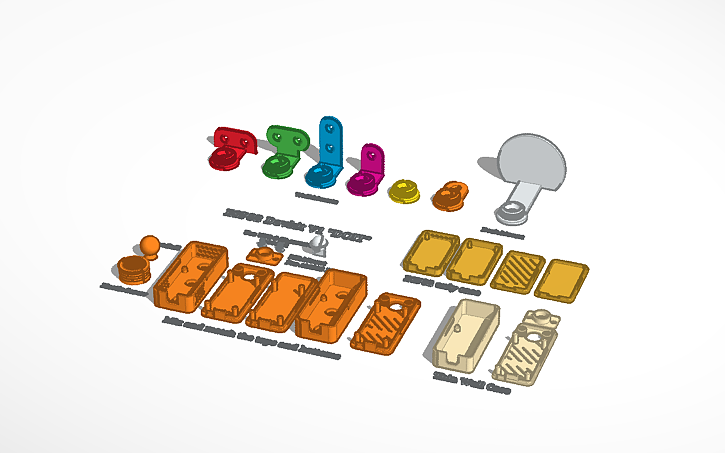
state_color: true3D Printed Case
To make the ESP32 devices look even half-decent in the rooms, I designed and printed cases. One model with the PIR sensor and one without it, the PIR case also has an optional wall mount . I used 6-32 screws (except for the wall), most commonly used to attach HDDs.